No Detective Work Required: Using User Activity Logs
Published March 14, 2025
Know Who, What, and When with User Activity Logs
NOTE: This feature is only available with the SecurePlus and SecureMax editions.
A lot of research involves detective work of one sort of another. The User Activity Log is, at least metaphorically, a resource for detective work. It tells administrators who did what, when they did it, and what the result was. It may not involve the “scientist as detective” trope (where the scientist hunts clues to unravel the mysteries of the cosmos), but it can certainly help with the day-to-day cases that come up and often end up in the laps of administrators.
For example, a participant may contact the administrator to solve the Case of the Missing Sign Up (“my timeslot has disappeared, I didn’t cancel it, and I need you to find how it disappeared and what I can do to get it back!”), figure out a credit granting/participation marking situation, or provide any number of answers to these and related questions. Nor are such queries limited to participants. Researchers too call on the detective administrator to explain how this or that participant was able to sign up for a study the researcher thought closed or otherwise inaccessible to said participant.
These questions and others like them can be answered without checking the log, but often with a decent amount of legwork most administrators would rather forego. Now they can. Instead of going through weblogs or contacting various users to obtain conflicting accounts of what happened, they can just check the User Activity Log…provided they know how. Naturally, that’s what we’ll look at next.
Accessing the Admin Activity Log
To access the activity log of a particular user:
- Use the “View and Edit Users” selection from the User Management dropdown menu to access the information page of the user whose activity you wish to view:
- Click the View User Activity Log button, located at top of the page:
- You may find that the View User Activity button has a slightly lighter color, indicating it is disabled, as shown below:
If your button is disabled as above, then go to System Settings to check your license type to ensure that you have either SecurePlus or SecureMax. Under “License Type” in System Settings, it well say either “SecureMax Edition” or “SecurePlus Edition” if you have the required license type.
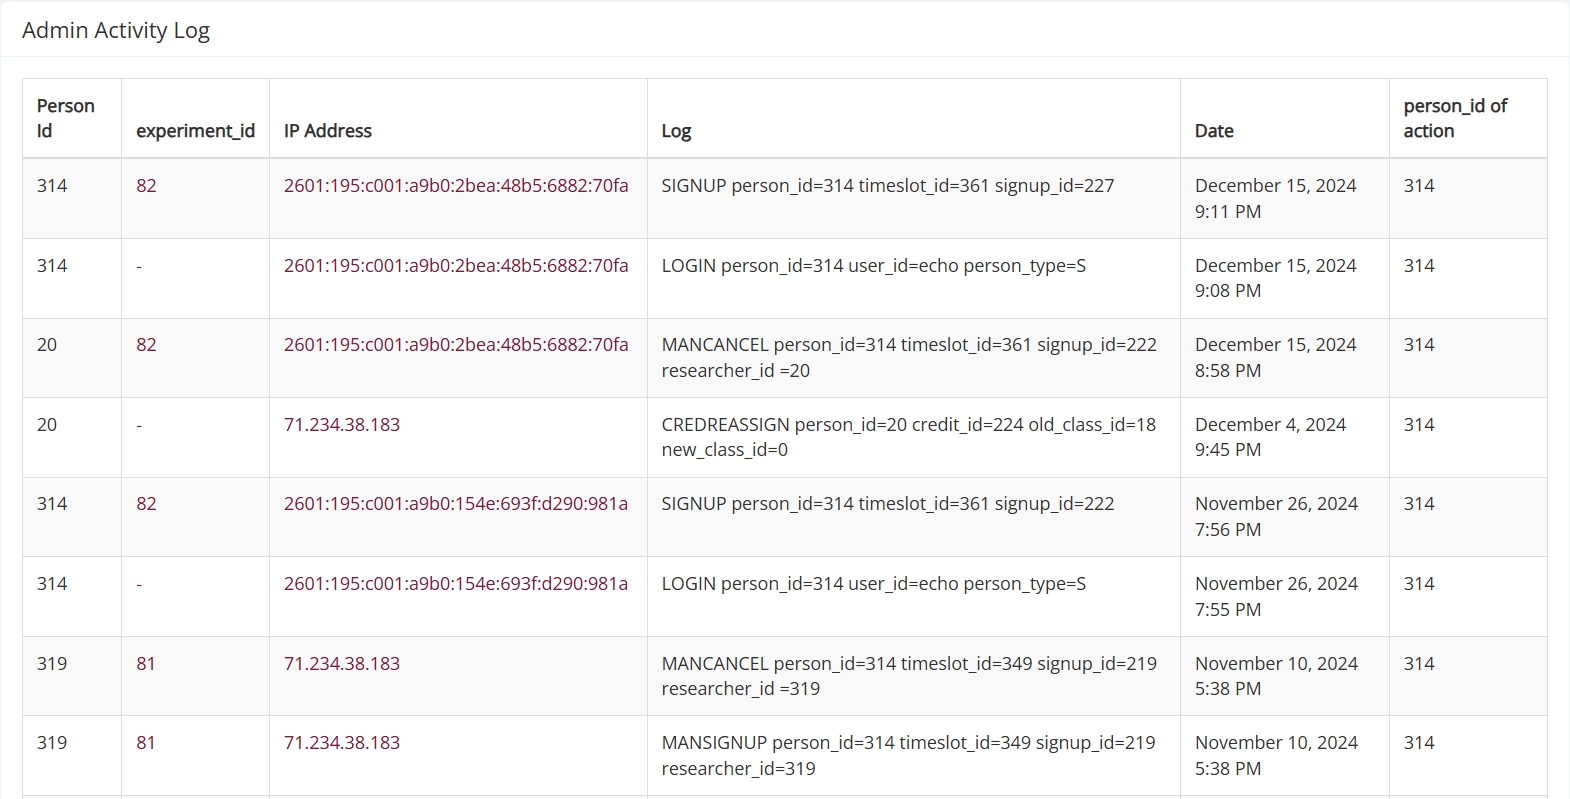
If you can click on the button, perfect! You’re there. The resulting page contains a record of that user’s activity:
To some, the table above may look less like a log of activities and more like something that belongs on a futuristic Rosetta Stone where each column contains either unreadable code or some explanatory text in a foreign language, all equally undecipherable. It’s not as daunting as a first glance may make it appear. In fact, it’s quite simple, providing you know what to look for. Naturally, this is what we’ll turn to next.
Decoding the User Activity Log
The User Activity Log is displayed as a table, so naturally the best way to break down the contents is to look at the columns and rows. In this case, the rows are easy. Each row is an activity recorded by the system. It’s the columns that tell you what information the rows contain about these logged activities.
Person ID vs. person_id of action
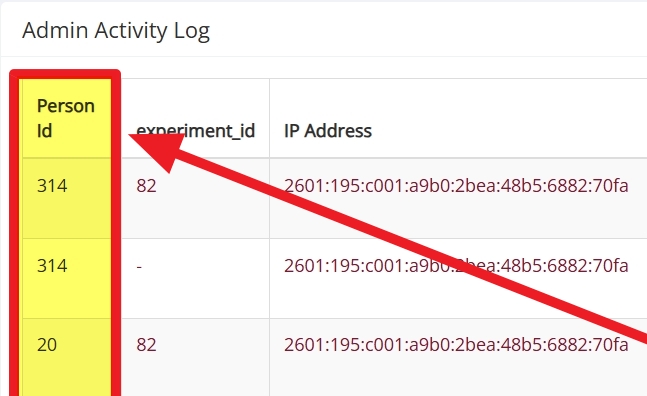
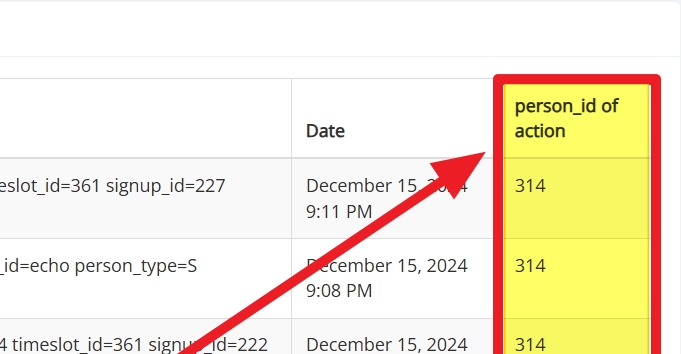
We’ll start with the first and last columns. Both of these involve user IDs, which is why we’re covering them together. The first column tells you the “Person Id” while the last tells you the “person_id of action”:
The “Person Id” (top image) is the unique identifier telling you the user who performed the action in that row (i.e. who logged on to the system, signed up for a study, etc.). The “person_id of action” (bottom image) is also an identifier, but rather than telling you who performed the action, it tells you the user affected by it. This may seem more confusing than it actually is, so let’s look at an example.
In the screenshot above, you will see that the person ID on the left and right column are the same (314). That is because that user logged on to their own account. The leftmost column (“Person Id”) shows who initiated the action while the rightmost column (“person_id of action”) shows who was affected. Often, as in the example shown above, the ID is the same, but not always. An example where they aren’t will help you understand the distinction. So let’s look at a researcher action that affects a participant, such as granting credit:
In this case, the user performing the action is a researcher granting credit. Their ID is in the rightmost column under “Person Id.” The user “affected” by this action, the participant, is in the last column under “person_id of action.”
As you can see, understanding the two identifiers is rather simple. One tells you who performed the action logged in a particular row, while the other tells you the ID of the user affected by this action.
So what of the other columns?
Other columns and “keywords”
The experiment ID (2nd column in the image below) is the unique identifier for the affected study:
If a cell in this column contains only a “-”, then no study was involved. For cases like signups, cancellations, etc., there will be a number there to signify a specific study.
The next (third) column is the IP address. The IP address is… Well, maybe a 3 minute Youtube video can explain this better..
…so in short, it tells you from which network the change was made.
Finally, the fourth column contains the log itself and the column header (appropriately enough) reads “Log.” In our example, we find the following text:
SIGNUP person_id=314 timeslot_id=361 signup_id=227
In the simplest of terms, this just means that the user with person_ID 314 signed up for a timeslot with timeslot_id 361. The action itself (sign-up) also has its own identifier: signup_id 227.
As an administrator, you now know when (the date) that the user signed up, which study they signed up for (via the experiment ID), and from where they signed up (via the IP address), with identifiers for all.
This example log was just that—an example. Cells in the “Log” column can (and will!) contain other information. Here are some other important “keywords” that can be found here with a short explanation:
| Logging Action | Description |
|---|---|
| SIGNUP | Participant signing up for a study |
| MANSIGNUP | Researcher signing up a participant for a study |
| CANCEL | Participant cancelling their sign-up |
| MANCANCEL | Researcher cancelling a sign-up |
| TSMODIFY | Modifying a timeslot |
| TSADD | Adding a timeslot |
| TSDELETE | Deleting a timeslot |
| LOGIN | User login |
| LOGOUT | User logout |
| STADD | Adding a study |
| STMODIFY | Modifying a study |
| STAPPROVE | Approving a study |
| STUNAPPROVE | Removing approval for a study |
| STDELETE | Deleting a study |
| STPRESCREEN | Setting prescreen restrictions on a study |
Finally, there’s one more important note you should be aware of. Your site’s users often perform actions they then undo, such as sign up for a study and then cancel the sign-up. Sometimes, this isn’t on purpose or it’s the cause of a problem brought to your attention (the Case of the Disappearing Timeslot or the Curious Incident of the Vanishing Sign-up).
One extremely useful aspect of the activity logs is that the record will remain on the log. If a participant signs up for a study, then cancels/deletes the sign-up, both actions will be on the activity log. Similarly, if a participant signs up and a researcher cancels that sign-up, this too will be logged.
As you can imagine, that kind of record is quite a handy detective tool when your trying to figure out what happened.
Concluding the Case: Final Clues
The table in the previous section above is not exhaustive. There are many more fields we didn’t include. Before we conclude, though, we thought we’d point administrators in the right direction. There are two more tools we have for that are appropriate to mention here.
The first is where administrators can find the complete table for the User Activity Log. Select “Help and Documentation” from the Administrator dropdown menu (which will take you to the Software Support page) and copy the license key to your clipboard. Then click on the Documentation button.
This will bring you to a page where you can enter your license key and download the latest version of Sona’s documentation.
The second tool, and our final helpful hint for admnistrators, can also be found by selecting the “Help and Documentation” option from the Administrator dropdown menu. It’s first button, and it reads “Contact Technical Support”. If you have more questions, you can use that button and we’re happy to help answer them for you!


