
External Study Credit Granting with Google Forms
While these instructions refer to “credit granting”, they work for both credit and paid studies. For paid studies, participation will be marked (instead of credit granted) just like with any other paid study.
Please note that, while these instructions will enable automatic credit granting/participation marking, Google Forms is not a fully-featured survey platform nor an experiment builder. This means it lacks the integration features typically found in such products.
Depending on your Google account type and settings, the code we’ve added to overcome this lack of features and to enable integration may result in different security prompts. Instructions for navigating these is provided in the Supplementary section.
If you find these integration steps to be too complicated or involved, we recommend trying one of the many existing full-feature survey products or experiment builders currently available.
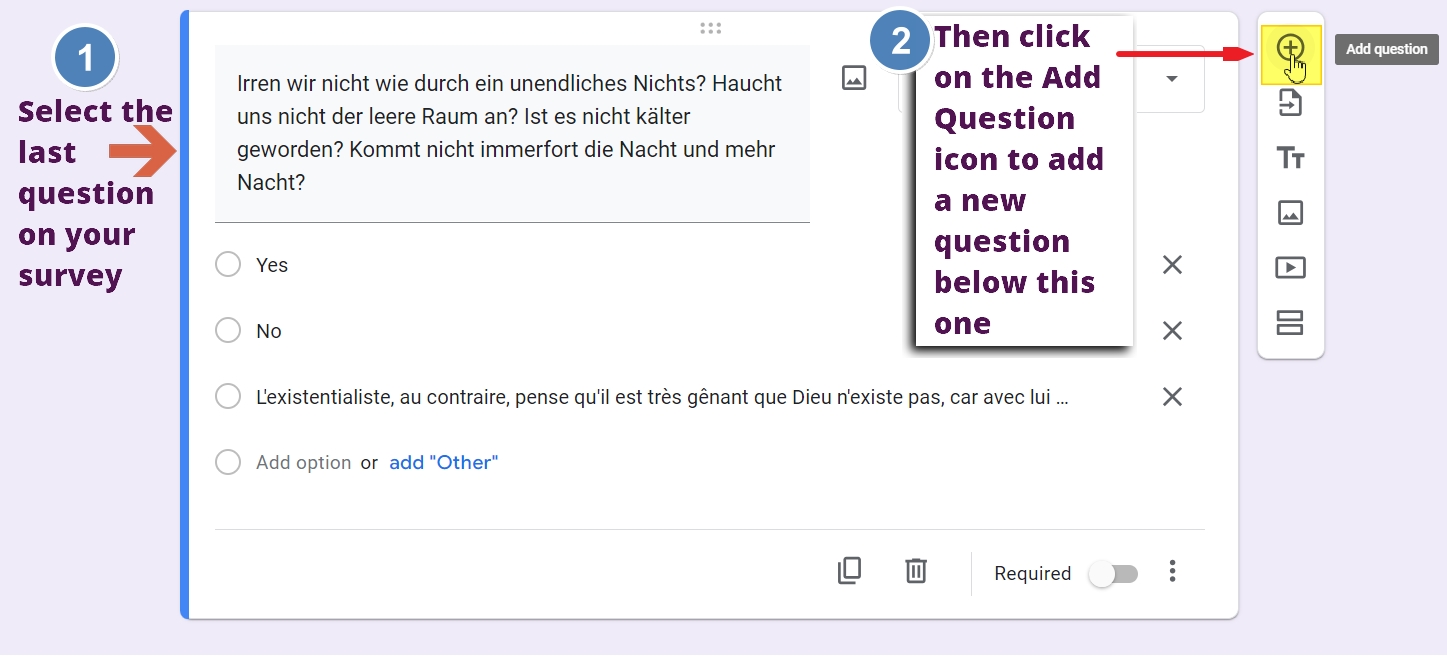
Step 1: Add an Internal Survey ID to your Google Forms Survey
Go to the bottom of your Google Forms Survey and click the icon to add a new question:
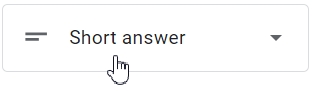
The new question you added should be a Short Answer question type. If it isn’t, then change the question type now:
Then copy and paste the following into the question text:
Internal Survey ID - Do Not Change (sona-survey-code)
Leave the answer blank. Your new question text should look like this:

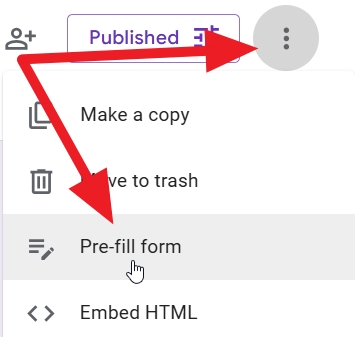
Step 2: Obtain a Pre-filled Link from Google Forms
On the top right of the menu options (next to the Send button) are three vertical dots. Click to open this dropdown menu, then select “Pre-fill form”:
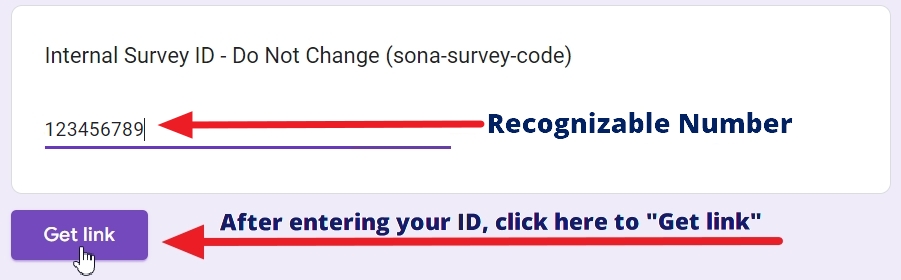
This will open a fillable version of your survey. Scroll down to the question you just added (which should be the last question). In the answer field to the Internal Survey ID “question” field, enter the ID number “123456789”, then click the “Get Link” button:
This will open up a button option. To get your pre-filled URL, click Copy Link:

You will use this URL to create your Study URL and configure your Sona study for integration in the next steps, so it may be worthwhile to paste it into a temporary document (that way, you can access it easily later and you need not rely on your clipboard).
Step 3: Change your Study URL in Sona
On your study page, click the Study Information menu button, then select Change Study Information. Scroll down to the Study URL section. You will only want to paste part of the URL you just copied, so if you haven’t already, it will be useful to temporarily paste the complete URL in a text editor (e.g., Notepad or TextEdit)
The URL you copied should look similar to the one below, with the placeholder ID number “123456789” after the “=” symbol:
Paste the copied URL into the Study URL field, then replace the placeholder ID “123456789” with %SURVEY_CODE%:

Once you have appended %SURVEY_CODE% to your study URL, scroll down to the bottom of your Change Study Information page and click Save Changes.
Step 4: Copy your Study’s the Completion URL
Your Study Information page should now contain fields customized for Google forms Integration. In this step, the important one is your study’s Completion Link:

You will need this completion link for the next step. Copy the link, and paste it into a document or text editor (e.g., Notepad or TextEdit) for later use. It should look similar the the URL below:
https://yourschool.sona-systems.com/webstudy_credit.aspx?experiment_id=123&credit_token=4e48f9b638a&survey_code=${surveyCode}
Please make sure your completion code ends with {surveyCode}
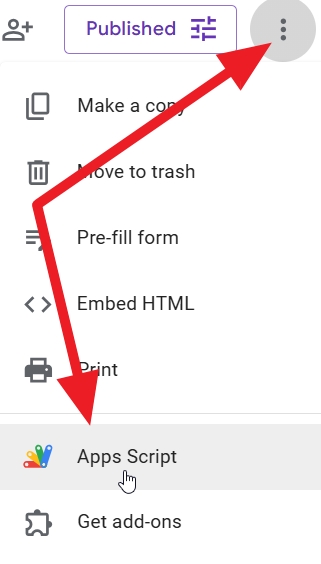
Step 5: Open Script Editor in Google Forms
In Google Forms, click on the three vertical dots icon to open the dropdown menu from before. This time, however, select the “Apps Script” option:
This will open a Google Apps Script window (note the name “Code.gs”; the extension .gs stands for “Google Script” and seeing it means you are in the write area to paste you your code):
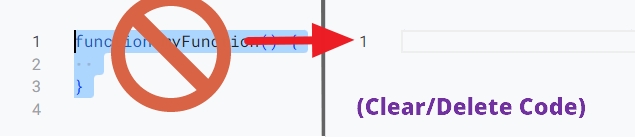
Delete the lines of code function myFunction() so that the editor is blank:
Step 6: Copy & Paste Code into Script Editor
Now that you have a blank script editor open, you can paste in the necessary code. The easiest way to do this is to move your cursor over the code block below. In the top-right corner, you will see a Copy to Clipboard button appear. Click the button to copy the code to your clipboard:
Once copied, paste the code into the script editor:
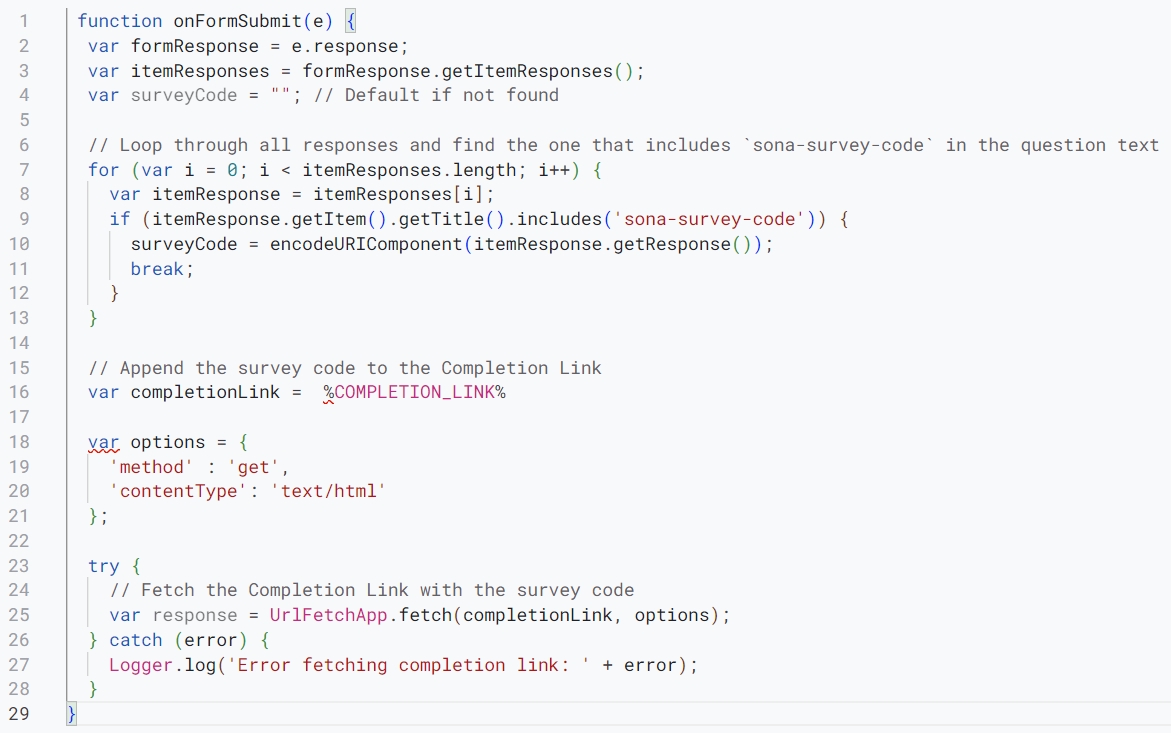
As a quick check, please make sure the number of lines of code you pasted matches the number (29) shown in the image immediately above. For the integration process to work properly, you must copy and paste the complete code from the code block above.
After you have checked to make sure you correctly pasted all the code, you will need to edit the completion URL in the script to match the completion URL you copied in Step 4. Find the line beginning with var completionLink (it should be line 16 in app script). In that line is a placeholder, %COMPLETION_LINK%, that you will need to replace with your completion code. The final result of this part of the code should look like this:
var completionLink = `https://yourschool.sona-systems.com/webstudy_credit.aspx?experiment_id=123&credit_token=4e48f9b638a&survey_code=${surveyCode}`;
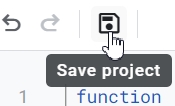
Once you have replaced the placeholder %COMPLETION_LINK% with the completion code you’ve copied, save the script by clicking on the Save Project icon, located roughly over the word “function” in the first line of your new code:
Step 7: Add a Trigger
Finally, you must indicate when your script should run by adding a trigger. You will be configuring your script to run whenever participants submit their responses, and there is a built-in trigger to do precisely this.
NOTE: Depending on your Google account type, how your account is configured, and other settings, this process may involve confirmation requests and/or warnings. If necessary, see the Supplementary section below for details and guidance.
To add the trigger, place your mouse over the alarm clock icon on the left-hand panel to expand the options (this will make sure you are selecting the correct menu option), then click on the icon:

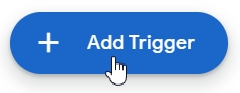
This will bring you to the Triggers page for your project. On the lower right-hand side, click on the Add Trigger button:
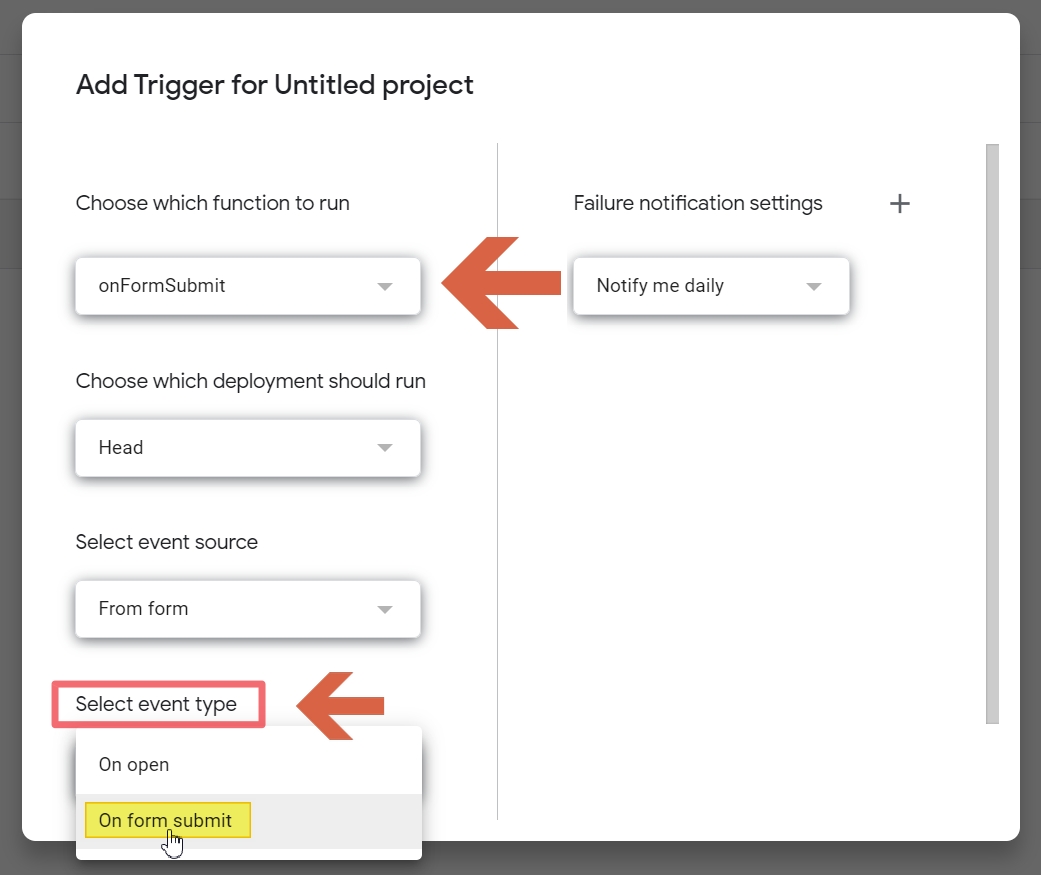
This will open the Add Trigger options. Please make sure to select both of the following :
- The function is
onFormSubmit - the “event type” is “On Form Submit”
The correct option settings are shown below:
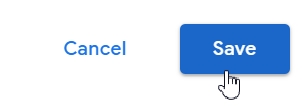
Once you have the correct function and event type, click “Save” to save your trigger:
You should now see the trigger you added on your trigger project page:

Once you have successfully added the trigger, you’re done! Your Google Forms survey is now integrated with Sona’s automatic credit granting process.
Supplementary Section:
Handling Warnings, Authentication Requests, and other Security Matters
Depending upon the Google account type you are using as well as other settings, you may encounter one or more requests asking you to confirm the account you wish to use. If possible, the account used to access the script editor and add the trigger should match the one used to create the Google Forms survey.
Additionally, because Sona Google Script code used was developed by Sona for Sona clients (rather than by e.g., Google itself), you may encounter additional warnings after adding the code to the script editor or when saving the trigger. If so, you can use this section to navigate through the requests for confirmation (both confirming your account and that you wish to proceed).
Typically, if you encounter the series of confirmation requests below, it will be after adding the trigger. To be systematic, we will approach each request, warning, etc., as it may occur after clicking “Save” when adding a trigger. However, if you encounter any or all of the authentication requests or warnings at any other stage, the same instructions apply.
Account Confirmation
After you click the Save button to add a trigger, you may be asked to select the appropriate Google account:
It is recommended that you use a single account for your project (i.e., the survey with your added script code and the trigger). If you have multiple authorized users who contributed to the Google Forms survey itself, only use one of these when adding the code you copied to the script editor and for the Add Trigger step.
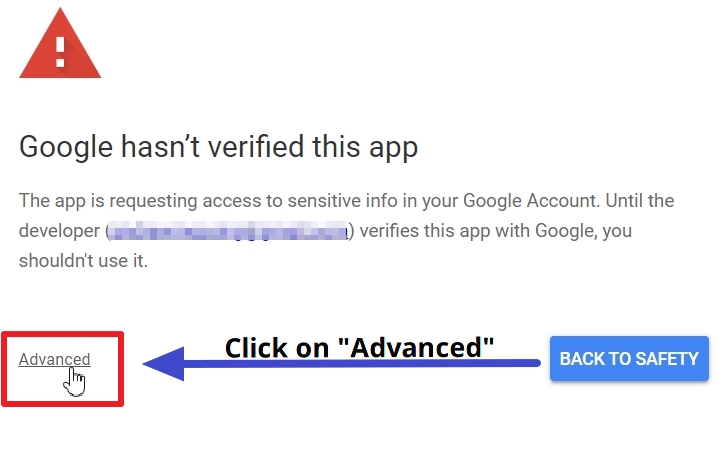
“Google hasn’t verified this app
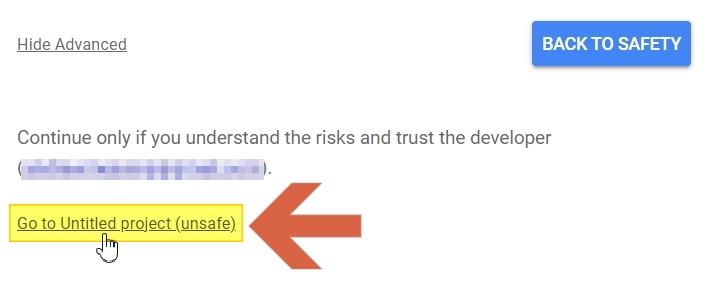
As noted above, this app was developed by Sona specifically for Google Forms integration with Sona. Its custom nature means it optimally suited for use with our Platform. It also means that it was not “verified” by Google. After you select your account, you may (depending on your Google account type and your settings) see another pop-up warning you that “Google hasn’t verified this app.” To proceed with the integration process, click on the “Advanced” option on the bottom left:
This will reveal the “go ahead” option. Click on the link “Go to [name of your project] (unsafe)”:
Complete the authorization process
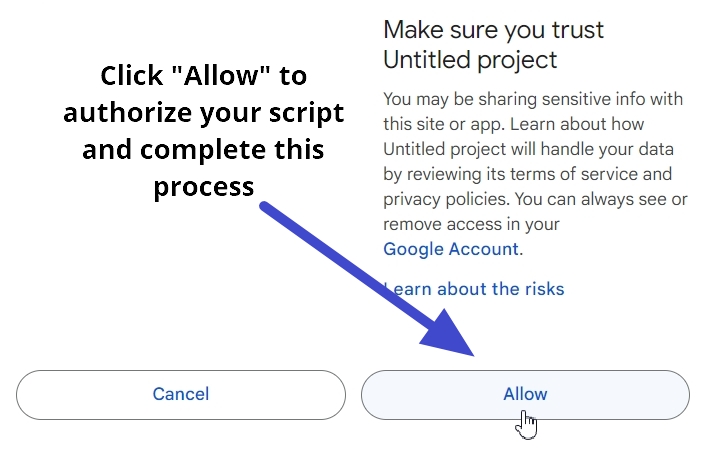
This will finalize the authorization process. If it began after you clicked Save to add the trigger to your script, then it will also complete the final integration step, too. Please be aware that you may receive a notification concerning your Google account, and may be asked to verify that you authorized the use of your project’s script and trigger.